
Indoor physical activity is important all year round. However, it can lead to increased indoor humidity, which can cause mold to grow in homes. This can harm health and cause respiratory issues, allergies, and other health problems.
Mold is a type of fungus that can be found both indoors and outdoors. These fungi release spores that float through the air. Mold spores are always present indoors and cannot be eliminated from indoor air quality. Mold spores flourish in warm, moist conditions. When they settle on wet surfaces, they begin to increase.
Common Causes Of Mold In Georgia Homes
In Georgia, mold on drywall is commonly caused by factors that contribute to excessive moisture within homes. These include:
- High Humidity: Georgia’s climate is predominantly humid, which can significantly contribute to indoor moisture levels.
- Inadequate Ventilation: Homes without proper ventilation, especially in bathrooms, basements, and kitchens, can trap moisture and encourage mold growth.
- Water Leaks: Leaks from roofs, pipes, or windows can introduce water into wall cavities, creating a prime environment for mold.
- Condensation: Condensation can occur on cold surfaces during warmer, humid months, leading to wet spots on drywall.
- Flooding: Severe weather and flooding are not uncommon in Georgia, and the aftermath often includes extensive water damage and mold issues.
How To Identify Mold On Drywall?
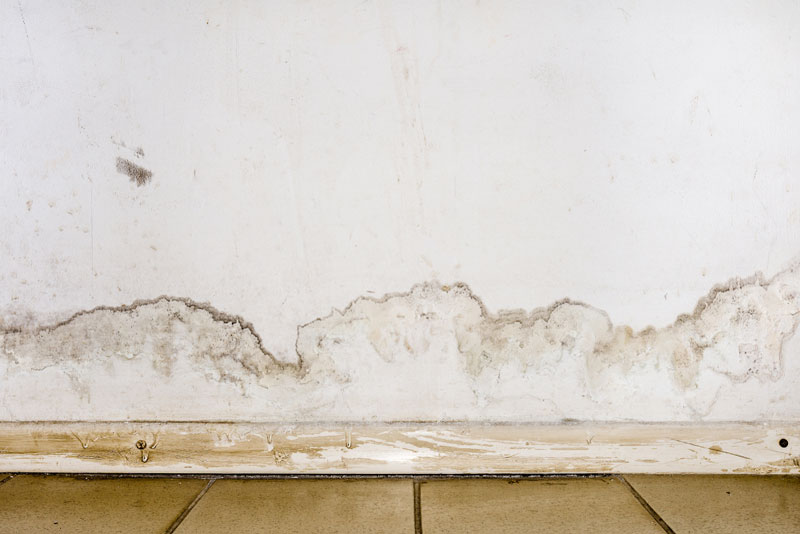
Mold on drywall typically appears as dark spots or patches concentrated in areas with high moisture. It’s most commonly found in parts of the house like bathrooms, kitchens, basements, and laundry rooms, which tend to be humid or have poor ventilation.
Mold is also prevalent after water damage, as drywall absorbs moisture. Although dark patches on walls may seem obvious, mold often grows inside the walls, making it less detectable. Here are signs of mold in your drywall:
- Discoloration and Stains: Yellow or brown stains on your walls indicate mold growth behind them. If these spots feel damp, it points to ongoing water damage and likely mold presence.
- Deterioration: If paint or wallpaper begins to crack, peel, or bubble, it may be due to moisture and mold. Water issues can also cause walls to warp, bow, or bulge, creating conducive conditions for mold to thrive.
- Odors: Mold emits a musty smell. A stuffy, stale scent is often a telltale sign of mold. For a closer inspection, sniff around electrical outlets as they provide access to the spaces behind your walls.
Removing Mold From Painted Or Coated Drywall
The removal process follows similar steps in cases where mold has affected painted drywall. However, you can often scrub and treat the surface with a cleaning solution instead of cutting the drywall.
Steps for mold remediation from painted drywall include:
- Prep the Area: Wear protective gear and lay down plastic sheets. Ensure the room is well-ventilated and sealed off to prevent mold spores from spreading.
- Soap and Water Cleaning: Scrub the affected section with soap and water to remove dirt and surface mold.
- Disinfect with Vinegar Solution: Apply the vinegar, water, and baking soda mixture and scrub away the mold using a toothbrush or scrub brush.
- Dry the Area: After cleaning, let the area dry completely with a fan to prevent mold growth.
- Repaint if Necessary: Once the drywall is dry, apply a mold-resistant primer and repaint to match the surrounding wall.
Removing Mold From Unpainted Drywall
Mold on drywall is a common problem homeowners face, especially in moisture-prone environments. Removing drywall mold requires proper knowledge, equipment, and a systematic approach. Below are the steps to safely and effectively handle mold in your home:
Step 1: Prepare the Area
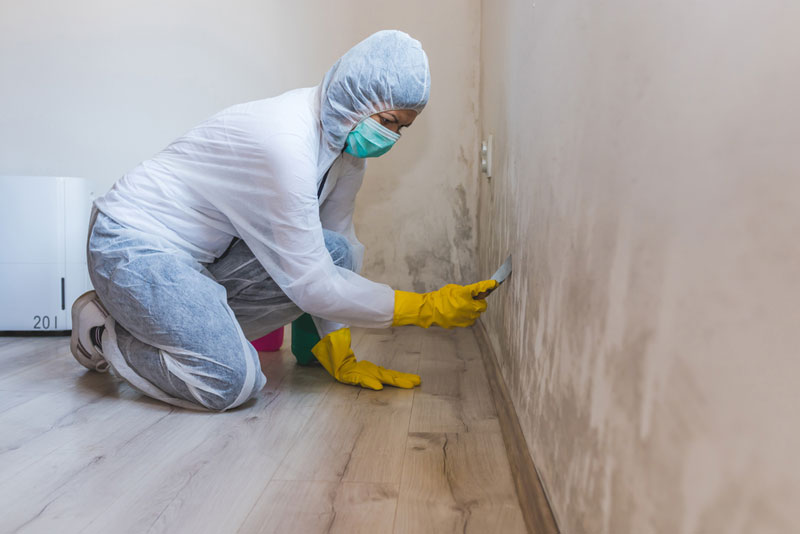
Before you take action, it’s essential to properly prep the area to minimize mold exposure and prevent further contamination. Lay down plastic sheeting on the floor to protect your home, and seal off the room from the rest of the house by closing doors and windows. Shutting off HVAC systems is vital to avoid circulating mold spores throughout the building.
Put on protective equipment, such as rubber gloves, safety goggles, and an N95 mask to shield yourself from black mold exposure. A protective suit is optional but recommended to prevent mold from spreading through your clothing.
Step 2: Remove Surface Mold
Mix dish soap with warm water for surface-level mold, and gently clean the area using a sponge. This will not kill the mold but help remove dirt, dust, and surface debris, allowing the cleaning solutions to work more effectively.
Step 3: Spray With A Mold-Cleaning Solution
Mix water, vinegar, and baking soda in a spray bottle for an eco-friendly cleaning solution. Avoid using harsh chemicals like bleach, as the EPA advises against it for mold cleaning. Spray the moldy section with this mixture and gently scrub it with a toothbrush or sponge. Don’t oversaturate the area, as excessive moisture promotes further mold growth. After scrubbing, use a fan to dry the spot thoroughly.
Step 4: Identify And Mark Stud Locations
If the mold has penetrated beyond the surface, it’s time to cut into the drywall. To accurately identify the wall studs, employ a stud finder and designate their positions using a pencil. This will help you properly secure the new drywall once repairs are complete.
Step 5: Cut Out The Moldy Drywall
Use a utility knife to carefully cut out the mold-affected drywall, leaving a buffer zone around the mold to avoid missing any hidden sections. Avoid using power saws, as they may stir up spores, increasing the risk of mold spreading or causing harm if electrical outlets are nearby. Always exercise safety when handling moldy materials to minimize your exposure.
Step 6: Check For Mold Behind The Drywall
Once the damaged section is removed, inspect the underlying studs and wall for any further mold or mildew. If you find mold on the studs, wood, or insulation, you may need professional assistance, as the mold might have spread deeper than initially expected. Before proceeding with repairs, you can use a mold sealant, like Kilz, to disinfect and prevent future growth.
Step 7: Install New Drywall
Measure and cut a new piece of drywall to the correct size to fit the space you’ve removed. Secure it in place with drywall screws into the previously marked studs. Use drywall mud or compound along the joints and let it dry. Once dried, sand the area until it’s smooth and blends with the surrounding wall.
Step 8: Dispose Of Contaminated Materials & Finish With A HEPA-Filter Vacuum
Carefully collect all the materials used in mold removal, including plastic sheeting, gloves, and other soiled items. Please place them in sealed garbage bags for safe disposal. Clean any reusable tools with disinfectants to avoid spreading mold spores to different areas of your home.
For thorough sanitation, vacuum the area with a HEPA filter to capture any remaining mold spores. Using a brush attachment can help lift spores from surfaces. Make sure to empty the vacuum canister outside to avoid recontaminating the area.
When To Repair Or Replace Mold-Affected Drywall
Knowing when to save or replace drywall with mold growth depends on several factors:
- Size of the mold area: If drywall mold covers a section larger than 10 square feet, it’s best to call professionals for the job. In many cases, they will recommend replacing the drywall.
- Depth of mold penetration: If the drywall feels soft, crumbly, or damaged to the touch, mold and moisture have likely weakened its structural integrity. In this case, it is wise to remove it, disinfect the framing and studs underneath, and then replace it for safety.
- Type of mold: Certain types, like black mold, pose significant health risks, requiring specialized protective equipment and handling. In such cases, it’s not only a matter of repair but also ensuring the environment is safe for people in the home.
If your drywall has lost its strength, it is best to remove the damaged section, apply cleaning solutions to the underlying materials, and allow it to dry completely before replacing it. Mold can easily thrive in moist environments, so proper prevention is key to avoiding recurrence.
Our Zero Damage Best Mold Removal Services In Metro Atlanta, GA
The mold removal process used by our Mold Assassins Experts in the Metro Atlanta area incorporates a series of precise and strategic steps, utilizing advanced technology to address mold infestations effectively and non-invasively.
Unlike traditional methods, which often involve extensive teardowns and potential damage to your property, our EPA-approved mold remover mist offers a noninvasive alternative. This unique misting technique distributes a dry sterilant across all surfaces, creating a robust germ barrier that eliminates existing mold and blocks new colonies from forming.
Our Cost-Effective And Less Disruptive
Our approach to mold removal is designed to be faster, less invasive, and more economical than conventional methods offered by other mold remediation companies. With our services, you receive a swift, effective solution that minimizes disruption and protects your home from the dangers of mold with guaranteed results.
Conclusion
Choose our mold removal services in Metro Atlanta for a swift, non-invasive solution that safeguards your home against future mold issues. Experience a cleaner, safer environment with our guaranteed and cost-effective methods.
Frequently Asked Questions
Is It Safe To Remove Moldy Drywall Yourself?
The EPA states that homeowners can manage small mold patches, usually around 10 square feet or less. However, for larger cases or when dealing with hazardous types of mold, hiring professionals with the right safety equipment, like safety goggles, gloves, and respirators, is recommended. Always assess the size and extent of the mold issue before starting a DIY repair.
What’s The Best Way To Kill Mold Behind Drywall?
When dealing with drywall mold behind the surface, scrub the mold-affected area with an all-purpose cleaner and a sponge or brush. You can then disinfect using either a liquid biocide or simple white vinegar. Avoid using bleach; it may not eliminate all mold types. After cleaning:
- Let the area dry completely.
- Apply a sealant.
- Ensure proper ventilation to prevent mold’s future growth.
Can Vinegar Safely Kill Mold On Drywall?
Yes, vinegar is an effective, non-toxic way to kill drywall mold. Spray the moldy section and let it sit for an hour before wiping it off with a sponge. However, be careful when scrubbing, as drywall can be fragile, and too much pressure can damage it. Always wear gloves and goggles to ensure safety and avoid skin or eye exposure to mold and cleaning chemicals.